Dalam projek ini saya membuat platform untuk mesin basuh.
Penyataan Masaalah (Problem Statement)
Mesin basuh saya diletakkan di luar rumah. Lantainya tidak rata, dan malangnya mesin basuh saya tidak mempunyai kaki yang boleh meratakan kedudukannya. Akibatnya, ia senget sedikit, dan membuat bunyi yang bising dalam kitaran bilas. Maka saya ingin membuat platform yang mempunyai kaki yang boleh dilaras, supaya apabila diletak di atas platform ini, mesih basuh akan berada di permukaan yang rata.
Bahan
Plywood setebal 9mm (3-ply) - kos RM45 untuk saiz 3' x 6'
Kayu keratan rentas 45mm x 20mm - kos RM0.60 sekaki
Set nut & kaki boleh laras - kos RM3.60 satu set
Pembuatan
Ini dia set nut & kaki
Sebelum buat apa-apa, saya cuba dulu cara untuk pasang kaki meja ini kerana tidak pernah buat. Saya cuba dengan kayu terbuang. Mula-mula, ukur nut untuk mengetahui garispusat lubang yang perlu digerudi. Kemudian, pergi beli bit gerudi jenis "penyodok" (spade - LOL) atau "forstner". Saya beli yang ini.
Kemudian saya cuba gerudi pada kayu terbuang. Kedalaman lubang perlu menyamai bahagian kaki yang berskru.
Setelah lubang siap saya ketukkan nut masuk ke dalam kayu. Mula-mula sedikit saja, untuk tengok kesannya.
Kemudian saya ketuk nut ke dalam kayu sepenuhnya, dan pasang kakinya.
Nampaknya semuanya berjaya, sekarang masanya untuk membuat yang betul. Saya mulakan dengan memotong plywood (maaf tak ada gambar). Kemudian saya potong blok kayu untuk kakinya.
Saya tandakan penjuru ke penjuru untuk mencari titik tengah. Kemudian saya cucuk dengan punch untuk membuat lubang kecil supaya mata bit gerudi tidak bergerak nanti tatkala digerudi.
Ini blok kayu setelah digerudi menggunakan bit penyodok tadi. Saya gerudi sampai tembus.
Ini selepas diketuk nut sepenuhnya ke dalam blok kayu.
Saya cuba lagi pasang kakinya. OK tiada masalah.
Sekarang blok kayu perlu dipasang kepada plywood. Saya guna empat skru untuk menyambungkannya. Saya menggerudi lubang pemandu (pilot hole - LOL!) supaya kayu tidak pecah. Mula-mula saya lakarkan outline blok kayu pada plywood. Kemudian saya tandakan lokasi skru. Kemudian saya cucuk lubang menggunakan punch.
Kemudian saya posisikan blok kayu ke plywood, dan kepilkan bersama menggunakan pengapit (clamp). Barulah saya gerudi lubang pemandu menerusi plywood, dan sebahagian daripada blok kayu kaki tadi. Kemudian saya skrukan terus sebelum gerudi & skru lubang berikutnya.
Ini satu blok kayu kaki sudah siap dipasang pada plywood.
Saya ulangi untuk blok kaki yang lain. Ini platform yang sudah siap.
Hmmm.... Saya kurang puashati kerana nampaknya plywood ini tidak cukup kuat. Bila ditekan bahagian tengah platform ini, plywoodnya melendut (flex). Mampukah platform ini membawa beban mesin basuh dengan muatan kain and air basuhan sekali? Hanya satu cara untuk menentukan, saya perlu cuba dulu.
Pemasangan
Saya cuba letakkan platform di tempatnya. Saya cuba laraskan permukaan platform supaya rata menggunakan dua perata gelembung (bubble level - LOL!) untuk paksi x & y, dan satu perata gelembung mata kerbau (bull's eye level - LOL!) di bahagian tengah.
Di sini timbul dua masaalah besar.
1. Platform terlalu lebar. Akibatnya, walaupun kaki boleh dilaras, namun di sebelah kiri tidak cukup tinggi untuk meratakan platform ini sepenuhnya. Kaki hampir keluar dari nut, tidak cukup ketinggiannya. Gambarajah yang dilampaukan (exaggerated) di bawah menunjukkan kesan masalah ini.
2. Juga disebabkan platform terlalu lebar, lubang tempat air keluar hanya muat-muat sahaja ditepi platform, dan tidak ada ruang untuk menganjak kedudukan platform lagi.
Percubaan seterusnya ialah membasuh kain dalam keadaan platform masih senget. Kelihatan badan mesih basuh bergerak-gerak dengan hebat kerana plywood lendut yang tidak kukuh. Bunyinya masih bising ketika kitaran bilas.
Kesimpulannya -
KEGAGALAN EPIK ! (epic fail!)
Pelan Versi 2
Untuk versi kedua, saya membuat perubahan berikut
1. Saiz platform cukup-cukup sahaja. Saya ukur jarak di antara kaki mesin basuh, dan tambah sedikit margin.
2. Saya kuatkan struktur keseluruhan platform dengan menambah rangka sokongan di bawah plywood
Pembuatan Versi 2
Saya potong plywood mengikut saiz yang lebih kecil
Saya buat rangka sokongan dengan brace penjuru.
Rangka sokongan ini kecil sedikit (2-3 mm setiap sisi) daripada plywood yang dipotong tadi, supaya saya boleh trimkan kemudian dengan menggunakan router. Saya cuba uji kelendutan struktur ini, nampaknya tidak melendut langsung.
Rangka sokongan ini digamkan kepada plywood tadi menggunakan gam kayu, dan dikepilkan semalaman sebelum diskrukan bersama.
Kemudian, plywood berlebihan ditrim menggunakan router, supaya searas (flush) dengan rangka sokongan. Ini diikuti dengan pemasiran (sanding - LOL!), supaya kayu rasa halus. Saya lihat ada sedikit lubang pada plywood, dan sedikit jurang (gap) pada beberapa bahagian di antara rangka dan plywood, saya gunakan penampal kayu (wood filler) untuk menampal semua ini. Seterusnya diikuti dengan pemasiran sekali lagi.
Seterusnya, pemasangan kaki, samalah seperti dahulu. (maaf tiada gambar)
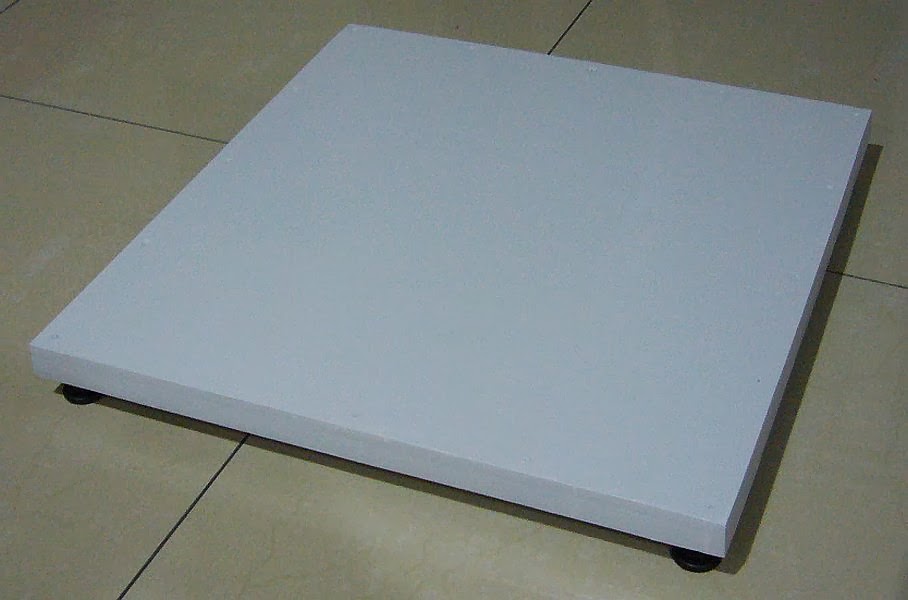
Selepas itu, proses mengecat. Saya gunakan speed undercoat, kemudian sedikit sanding, diikuti dengan warna akhir, kelabu muda. Cat ini sudah lama saya beli, ia sebenarnya cat dinding luaran.
Inilah hasilnya selepas dicat. Kelihatan seperti sekeping plywood tebal dan nampak cantik, boleh tahan juga. (maaf, angkat bakul)
Pemasangan 2
Proses meratakan platform berjaya! Gelembung pada perata mata kerbau berada tepat ditengah-tengah!
Ujian membasuh kain juga berjaya! Bunyi bising sudah tiada!
Kesimpulan
1. Projek gagal epik bertukar jaya
2. Hasil buatan boleh tahan, sama warna dengan mesin basuh secara kebetulan
3. Rekabentuk perlu berhati-hati mengambil semua faktor
Istilah nak tergelak kali ini
bit gerudi penyodok - spade drill bit
lubang pemandu - pilot hole (takkan pulak lubang juruterbang??)
perata gelembung - bubble level
perata mata kerbau - bull's eye bubble level (mmm rasa lapar pulak)
pemasiran - sanding
Sekian sahaja, saya tutup Projek Washer Platform.